Well, Static website has been the solution to most of the requirements that a dynamic website can’t provide for us. Like speed and security.
We’ve got no doubt about the speed, but today am here to talk about the security part.
You know we are now in the JAMstack generation. where we now have Static Site Generators of most of the frontend Frameworks like Vuejs(Gridsome), Reactjs(Gatsby) and Go lang(Hugo).
Building things with them via templating engine, writing and reading to our database.
Knowing that nothing is 100% hack-proof. so if you are planning to deploy your static website code next time or better still when you want to redeploy.
I will share with you some best practices you can follow to secure your static websites.
Let’s dive right in.
Using Security HTTP Headers
Using our HTTP Response Headers well, we can prevent some of these vulnerabilities.
Most of the browsers we use today have some of these security features which are turned off by default.
But we can turn them ON for our web app using the HTTP Headers.
So what this HTTP response header does is that it tells the browser what to do, how to handle and give out contents. But not all browsers support all the HTTP Headers.
But the common browsers do support them.
Cross-Site Scripting(XSS)
Cross-site scripting is a kind of attack, whereby the attacker inputs a malicious JavaScript into your webpage.
The results are quite devastating. If the scripts injected got executed. The attacker can change the DOM, access local storage and non-secure cookies, listen to user events, exfiltrate user data and do a lot of things depending on the Attackers experience of chaining VUlns.
But don’t panic we can still go around this, Using the browser and also you need to learn to write secure codes.
1# Using the HTTP Header to Eliminate this
X-XSS-Protection header is designed to protect websites from Cross-Site Scripting. This header feature can be implemented in two ways:
X-XSS-Protection: 1
X-XSS-Protection: 1; mode=block
What the first one does is that the browser sanitizes a webpage removing the unsafe parts when an XSS attack is detected.
The second rule is more secure because it filters instead of sanitizing, so when an XSS script is detected. It will prevent the page from rendering.
The second rule is the most recommended rule by the OWASP community.
2# Taking Care of Rendering our Templates
We all know that prevention is better than cure. The easiest way XSS can get fired is when an attacker gets a script tag into the DOM.
So, why don’t we stop the attacker from doing that? You need to stop the use of innerHtml, preferably use textContent to make textual updates.
Escaping user-provided strings with a js library such as sanitize-Html to transform “ into a harmless < and many more.
You can learn more at OpenClassrooms secure coding to prevent XSS and OWASP Guide
Man in the Middle Attack
1# Encrypt Everything
Encrypt all traffic to your website using TLS (aka HTTPS) is one of the first security settings to be observed. Having HTTPS is also gives an SEO benefit to a website.
Having TLS in place will prevent a third party from listening in on your users, and there is nothing preventing a third party from pretending to be your site.
If you’re deploying to a dedicated static site hosting solution like Netlify, Firebase, Vercel and others.
Then we have the first problem solved because they provide TLS encryption free. Most of them provide it via Lets Encrypt.

But we can go a long way by adding Cloudflare SSL Full(Strict). Which ensures the encryption doest end on the Users to Cloudflare alone but it helps encrypt from Users to Cloudflare and from Cloudflare to the Web Server making sure no one can eavesdrop.
2# Knock The Sniffers Out
Besides, in a pineapple scenario. an attacker could try to impersonate your site, forcing an unencrypted connection. In that case, the Strict-Transport-Security header is your friend.
HSTS header instructs the browser to always allow a user to connect over HTTPS instead of HTTP.
This means that all the link that a user type in browser get forced to use HTTPS, even when they write HTTP.
(although most do, of course, this is actually a minor drawback).
The Strict-Transport-Security header has different options, which are separated by semi-colons:
- max-age = [value] — for how long the browser should honour the header before checking for it again (in seconds)
- includeSubdomains — are subdomains included as part of this policy? (Default is no)
- preload — instructs the browser to inform the browser author to hardcode your site into the list of sites that should never be connected to over an insecure connection.
3# Public Key Pinning
Attackers can fake the cryptographic certificates which you use to encrypt your website.
If you notice things well. you will be familiar with an error saying “Website modern browsers always inform users that they are connecting to a site with a bad security certificate.
But we don’t always care about the warning message. we just click Advanced to website.
So What Public Key Pining does is that. it allows you to protect your website by providing a whitelist of cryptographic identities that the browser should trust.
So the browser will only trust and encrypt traffic to your site with the security key you’ve set. Anything beyond that the browser will reject it.
We can set this up using the Public Key Pinning header.
- pin-sha256=”[value]” — This specifies the SHA256 hash of a valid TLS key that is permitted to encrypt traffic to your site.
It’s better to list many keys, so if one of the keys gets revoked (or you mistyped the hash!), and there are no fallbacks, your site will get bricked.
So always set at least two valid keys in advance, just in case.
- max-age=[value] — The duration, in seconds, that the key should remain pinned.
- includeSubdomains — when present, indicates that the policy should affect all subdomains.
Referrer Leakage
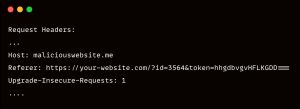
So here is a scenario, let’s say you have a page on your web app that carries credentials or token via its URL just like this
https://your-website.com/?id=3564&token=hhgdbvgvHFLKGDD===
So now if the user mistakenly clicks on any external link on this same page, maybe it was embedded by a malicious user.
So whoever owns this external link that was clicked. will get the header response that contains referrer which has your own website user id and token.

And that’s how the malicious users can further his or her attack. If there is a weak auth issue on your web app. It can lead to different vulnerabilities base on Business Logic Vulnerability.
This is just how we know those who visit our website and from where they came from. it’s just the way Google Analytics work. That’s how we see the number of people that come to our website from another website.
So now let’s fix this. we are going to make use of the Referrer-Policy response header.
Which will help us instruct the browser on when and how to construct the Referrer request header.
Here are the few values to consider using to set your referrer response header.
- no-referrer – This value instructs the browser to never send the referer header with requests that are made from your site. This also includes links to pages on your own site.
So it means you won’t be able to track visitors on your website. Where they visit and which pages perform well. so “no-referrer” is no option here
- No-referrer-when-downgrade – this is the browser default. it doesn’t seem good because when a user visits your pages from an HTTPS to HTTP, it won’t send the referrer header.
But if they visit your site from HTTP to any other origin. It will send the referrer response header. So it’s not good.
- Same-origin – This is the best option, what this value does is that. referrer response header will only be sent to pages that contain the same origin. But it will never send the referrer response header information to destinations of different origin.
So it will always send the referrer header if a user moves from
https://your-site.com/test to https://your-site.com/contact
But it will never send the referrer header if a user moves from
https://your-site.com/test to https://another-site.com
https://your-site.com/test to http://another-site.com
https://your-site.com/test to http://your-site.com/contact
- origin – this value here will instruct the browser to always strip any path information from the referrer header. and send only the origin from which the request was made
- origin-when-cross-origin – this value is like “origin”. The browser will only the referrer header if the origin Is the same but it will never send the referrer response header if the origin is different.
So that’s it, picking what referrer policy to set now depends solely on what you intend to do on your static website. But I see the value “same-origin” to be a nice value to use.
You can also learn more about referrer header here
Clickjacking
Clickjacking is when an attacker uses many transparent layers to trick a user into clicking on a button or link on another page. when they were intending to click on the top-level page.
Thus, the attacker is “hijacking” clicks meant for their page and routing them to another page. most likely owned by another application, domain, or both.
1# Using Frame Options
We can use X-Frame-Options header to activate the security features of the browser to protect against some malicious act. Whereby a hostile render your own site into an iframe on their websites.
X-Frame-Options will instruct the browser whether it is permitted to render your page inside an iframe tag, easy as that. Let’s look at the values we can define to protect this.
- DENY — never allow this page to be rendered inside an iframe tag, the safest option
- SAMEORIGIN — only allow this page to be rendered inside iframe tags on the same site.
- ALLOW-FROM — provide a whitelist of domains permitted to render this page in an iframe tag.
So if you are not using anything related to iframe on your web app, then use the “DENY” value.
2# Iframe Sandboxes
And if you must use an iframe on your website then, it’s better to render it into an iframe sandbox.
By default, including sandbox in the iframe tag will prevent the browsers from executing any scripts. also, it will stop anything such as rendering styled HTML.
Then you can now add extra behaviours such as allowing popups, execution of scripts and more.
Well, we’ve talked about using HTTP Headers to protect some common Vulnerabilities type. you might want to know how to put them in place on your static website.
There are different ways of implementing it, and it varies based on the hosting or static website generator that you’ve used or about to use.
So it means you can always configure HTTP headers either using the config file of your static website generator. or using the config file of your Hosting providers such as Netlify and the rest.
But here I will be showing you how to set the HTTP header for the 4 most common hosting providers/webserver.
How to set HTTP header for a site hosted with Netlify
If you’ve been hosting well on Netlify, you had been familiar with the netlify.toml or netlify.yml file.
And if you are new to this. it’s not something hard to setup. You just need to create one In the root of your static website project.
And then add the following config in the file, you also change the values to suit your own requirements.
[[headers]]
for = "/*" # This defines which paths this specific [[headers]] block will cover.
[headers.values]
X-Frame-Options = "DENY"
X-XSS-Protection = "1; mode=block"
Referrer-Policy = "no-referrer"
Strict-Transport-Security = “max-age=31536000; includeSubDomains; preload”
NB:- If you are using Cloudflare as your CDN already. There is an option to set this over there, so you can choose to set the Strict-Transport-Security here or via Cloudflare. Anyone is okay.
How to set HTTP header for a site hosted on Firebase
For the Firebase Guys, you can get this done using the firebase.json file, once you initiate firebase in your project. It usually comes along, but if you can’t find the firebase.json file.
You will have to create one in your project root folder. then you can add this HTTP headers config below, its in JSON format.
You can modify the config to fit your own website need.
"hosting": {
  // HTTP headers
  "headers": [ {
    "source": "*",
    "headers": [ {
      "key": "X-Frame-Options",
      "value": “DENY”
     "key": "X-XSS-Protection",
      "value": “1; mode=block”
     "key": "Referrer-Policy",
      "value": “no-referrer”
     "key": "Strict-Transport-Security",
      "value": “max-age=31536000; includeSubDomains; preload”
    } ]
  } ]
}
How to set HTTP header for a site hosted on Apache
If your static website is hosted on an apache webserver, then you can this done using the .htaccess file in the public_html root of your Cpanel.
Edit it the .htaccess file and change the values set to the header config below to whatever feats your web app.
<ifModule>
Header always set X-Xss-Protection "1; mode=block"
Header always set X-Frame-Options “DENY”
Header always set Referrer-Policy “no-referrer”
Header always set Strict-Transport-Security "max-age=31536000; includeSubDomains, preload”
</ifModule>
How to set HTTP header for a site hosted on Nginx
To implement this on your static website that runs on the Nginx web server, locate your nginx.conf file, edit it and paste the below config. Modifying it to feat your websites option.
add_header Strict-Transport-Security "max-age=31536000; includeSubdomains" always;
add_header X-Frame-Options "SAMEORIGIN" always;
add_header X-Xss-Protection "1; mode=block" always;
add_header Referrer-Policy “no-referrer” always;
Avoid Vulnerable JavaScript Libraries

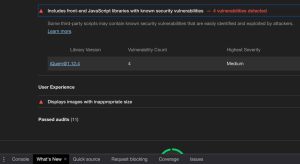
Most Devs usually don’t pay attention to this. Making use of Vulnerable JavaScript libraries imposes a security risk.
So don’t say because your website is a static website, so you are safe. NO
It’s considered that 20% of those javascript libraries makes a website more vulnerable. But you can always use Vulnerability DB to check if a library is safe or not.
It also provides a detailed guide on the vulnerabilities of most libraries.
Here are a few tips to go around this issue;
- It’s better to host the libraries on your own host. Instead of fetching it from an external source. And If you must use external libraries. make sure you are checking the security of external servers periodically.
- Make sure you are using the latest version of the javascript libraries. or better still make sure the libraries you are using is free from any vulnerabilities. You can use retire.js to detect the use of any vulnerable version of libraries that you using on your website.
- Injection attacks are not something common in static websites, but its good to do a check once in a while.
So as to make sure your website isn’t loading any libraries you don’t know about. Make Chrome Dev tool your friend, it will figure that the issue out for you.
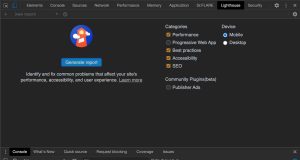
Inspect your website via Chrome Dev tool, when the console tab opens up, locate Lighthouse and click on the generate report.


it will take some time to finish the test, once it’s done, scroll down to the Best Practice Result to see if your website uses a version of js library that is vulnerable
Put in place Backup Strategy
Having a backup is a thick solution within the tech community. So that you will be able to come back strong and fresh as you are. if anything goes wrong with your production environment.
Your backup copies must be safely stored and easily accessible. That way you will be able to restore your website in the event of a crash.
There are many ways to back up your codes. Physically or Online Clouds. Physical Backups like FlashDrives.
But flash drives can get stolen or lost, so Online Backups like Github, GitLab and Self Hosted Git
And you can also check into the Hosting Platform you are working with. if they have an automatic backup in place or something like a version staging in place, where you just redeploy old version of code.
Deploy DDoS protection
Distributed Denial of Service (DDoS) attacks are becoming increasingly common nowadays.
In this type of attack, a set of distributed devices is used to overwhelm a server with a flood of requests. until it consumes the bytes allocated to your web server and stops working.
thinking that your website has static content? Yeah, it’s true but that doesn’t mean your web server isn’t vulnerable to DDoS. So thing measure is the best.
And the easiest way to do this which almost every web on the internet adopts is using a security service provider who will take care of all this threat.
This service will provide intrusion detection, antiviral service, vulnerability scanning, and more. so you practically don’t have to be concerned about any threats.
For those looking to use a free security service. Cloudflare is the best option, adding your site to Cloudflare, you get the DDoS protection.
But you might want to go for a business plan. if your website has the tendency of getting much users and popularity in future.
You can also look into Services like Akamai, Sucuri. They don’t offer DDoS protection alone. They also provide malware scans and other security services that a web app might need for adequate security.


Comment:HOW CAN I SECURE ANY OF MY SOCIAL MEDIA USING THIS PROCEEDURE?
Social media online security guidelines will be shared soon
Comment:HOW CAN I SECURE ANY OF MY SOCIAL MEDIA USING THIS PROCEEDURE?
Social media online security guidelines will be shared soon